Tuesday, April 7, 2020

Docker Concepts

What is docker

Docker is basically a software containerizing software. It is more like using a Virtual machine (VM), but with more advantages than using a VM.

Virtualization

Separate environments are needed to deploy and test applications, to avoid risks of damages and losses in a real environment.
Virtual machines or VMs introduced to avoid this problem. If something wrong happens in VM, just remove and create a new one

Docker vs VM

VM is just like running another machine (guest) on top of your machine (host). It simply denotes when you run a Ubuntu VM with NodeJS server on a Windows host machine, it totally costs resources like CPU, RAM, disk amount, which is needed to run two separate Windows and Ubuntu machines with its software.


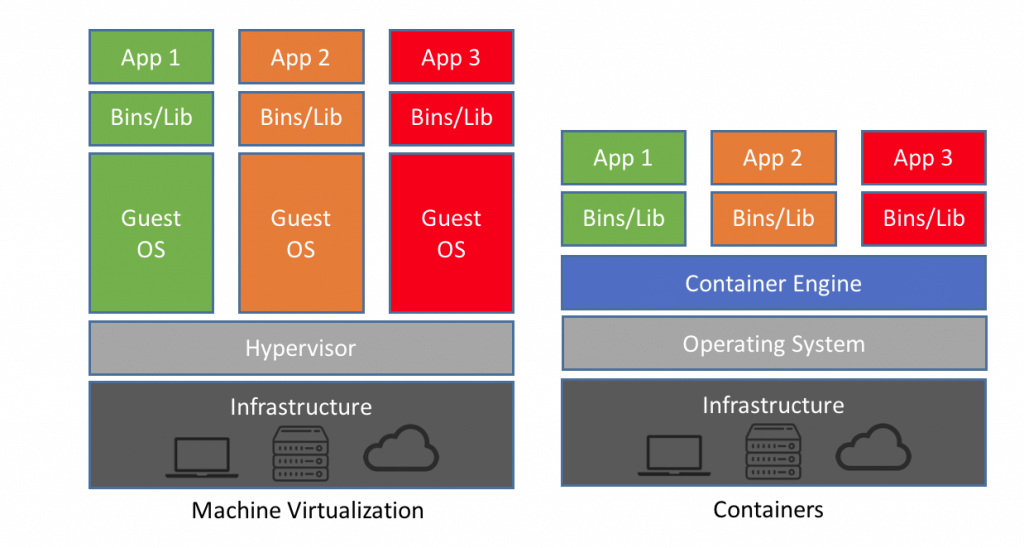
(image credits: https://www.guru99.com/docker-tutorial.html)

In the same scenario above, when we are using docker, it needs only NodeJS image and a container (explained in a moment)

Glossary

Image - It is like a class in OOP. Basically defines the software attributes, resource levels permitted to use
Container - It is like an object in OOP. Container is an instance of Image. There can be multiple containers from same image. We interact with containers when executing docker
Registry - All the docker images are stored in docker registry. Docker users can get and push images to use in projects. Public and private registries are available to store images

Why Docker

Docker containers run on top of the host's Operation system.
Docker containers run in an isolated environment on top of the host's OS
Can run more containers on the same infrastructure than running more Virtual machines
Images, containers, Network interfaces are shareable
Only essential programs can be used in images, while removing unwanted programs
Easy to add and remove software from system


Disadvantages

Graphical Applications not work well
Containers are not speed as host machine installed applications
Some container products don't work with other ones
All of the data inside a container disappears forever when the container shuts down unless we use a persistent storage location


Sunday, April 5, 2020

How to use 'Dialog 4G router' sim in mobile phone

Disclaimer: This is not an attempt of hacking a router or a misusing a service provider's resources. Whole purpose of this tutorial is knowledge sharing on how to overcome below mentioned problems. This is not guaranteed that it works on any mobile device. Be kind to use this tutorial only for educational purposes.

If you are a user with a Dialog 4g router, worst problem is you need to carry the router and its adapter wherever you go and, finding a square ping socket to plug it. And during power failures this router cannot be operated unless you use a UPS.
Now you can avoid these problems if you have a mobile phone which is capable of accessing LTE networks. So the router's sim can be inserted to mobile phone and use its data connection in your phone or using the phone as a mobile hotspot with dialog 4G sim inserted.

For this demonstration I used a Xiaomi redmi note 8 phone. You can use any phone with following specifications.
  • Supporting LTE networks. ( we want 2300 Mhz LTE band 40 )
  • Supports to use only LTE network (access has to be restricted for 2G and 3G)
  • Mini sim slot (I had to cut the existing sim as a nano sim to use with my phone)
First we need to verify the SIM is working as expected in the Dialog 4G router. This is the screenshot when our demonstration SIM was used with Dialog 4G router


Insert the dialog 4G sim to your phone. Then select preferred network type as "LTE only". You can dial *#*#4636#*#* (or *#*#4636*#*#) to get this menu.
This pic was taken after completing the tutorial.

Then,
"settings" ->
"SIM cards & Mobile networks" ->
"SIM1" or "SIM2" depending your sim slot ->
"Mobile networks"
Note: This path may be different depending your phone brand & OS

First try to use auto network connect with LTE only mode. It may correctly connect to Dialog 4G network.
If not try to connect to mobile network manually. This is the result list I got after selecting only LTE networks in my phone, and doing a network scan.


41311 is the MNC/MCC number for dialog 4G.
https://www.apnsettings.org/srilanka/mcc-mnc-code-for-sirlanka/

Wait even it connected to Dialog 4G mobile network, still you don't have internet access, obviously only Emergency calls are allowed.
You need to set APN settings as following.
Name: any_name;
APN: <empty>

But your phone won't allow to save an empty apn. So you need to type a 'space' in APN field and save it.

Now it establishes a data connection.
https://blogger.googleusercontent.com/img/b/R29vZ2xl/AVvXsEg5pymYQA18dE7CLTLs8US1agSprH6-6GxhDFL3iZjrBTVt3VmIyTc6i2Tn4IDYkoZ-7-QhFQHpKSaiiUHHRlztvafWFvacHJgPH86-FijvjRV2EBlfLYiBVdKXaQPbaw0QeT4ULa8qPIC0/s1600/afterconnectLTEonly.jpg


Now you can see you are connected to 4G data network. Anyway you cannot use voice and sms using this 4G sim. If you have a dual sim phone, you can use the other sim slot for voice and sms.

Thursday, January 23, 2020

Dell - Download pre-installed Windows operating system for your Dell computer


If you have a Dell (Laptop / Desktop) computer with genuine windows operating system pre-installed, you may afraid to format the machine because losing of a genuine operating system. Fortunately Dell offers you to download this pre-installed operating system, without needing to go to service center.

You have to enter your Dell machine's product code to obtain this pre-loaded operating system.

Visit following link and enter your machine service tag
https://www.dell.com/support/home/us/en/04/drivers/osiso/win


After entering the service tag of your device you will be shown all available operating systems for your device. You can download the operating system you want as an ISO image.


Alternatively you can use Dell OS recovery tool to view, download and burn the ISO images. It will also ask your Dell service tag

Wednesday, January 22, 2020

Ubuntu dual booting Dell laptop with preloaded windows


First of all we need to download the original dell windows .iso image from dell official website, as a precaution in case of something goes wrong

Download using Dell recovery tool
https://www.dell.com/support/home/us/en/04/drivers/osiso/recoverytool/
https://www.dell.com/support/article/us/en/04/sln301761/how-to-use-the-dell-hosted-recovery-image-of-linux?lang=en#Issue3
Keep this iso image burned in DVD or a bootable USB separately
You can use this link for more details about downloading pre-installed  Operating system.

You need to check harddisk partition scheme, it should be GPT, almost all the preloaded windows OS are installed in UEFI mode.
- Right click "This PC" -> "Manage" -> "Disk management"
- Right click on hard disk (on windows installed hard disk, in case of more than one hdd installed)
- Click "volumes" on new opened box. Now you can see the partitioning scheme (I already installed Ubuntu, its swap and root partitions are also shown in below diagram)


- We need to create some unallocated hard disk space to install Ubuntu

In machine/laptop BIOS setup,
- Turn off secure boot (Recent Ubuntu versions are compatible with secure boot)
- Use AHCI as disk mode
- Disable fastboot in windows OS

You need to have Ubuntu, Linux Mint or any other linux variation to use as the dual booting OS.
I use Rufus to make my USB bootable. Alternatively Unetbooting also works, but YUMI multiboot did not work in my machine.

Make the USB bootable in UEFI mode if your machine has GPT, else make it BIOS if partitioning scheme is MBR

After creating the linux bootable USB restart the machine, boot the usb drive. You should choose "Try Ubuntu without Installing" option.

Wait till Ubuntu live session starts.

If your machine has nvidia  graphics it may show a black screen and shows nothing. To solve that problem you can refer this post

Then open "gparted" program and verify that same disk partition scheme is shown in Ubuntu also. (Disk sizes may shown slightly different, but the partition order should be same). And the unallocated hdd space should also shown.

If you just see only an unallocated partition in "gparted" there is something wrong. Please verify that you use same GPT or MBR partition scheme in windows OS and Ubuntu image. Don't proceed with installation

Now you are ready to go with installation. Exit "gparted" and click on "Install Ubuntu to Hard disk" on desktop. Proceed with installation. You will see your windows installation is automatically detected by Ubuntu setup


Saturday, July 6, 2019

React Redux


Why Redux?

Redux is used to maintain a global data store for the whole react application, which determines a very important concept, "Single source of Truth".

If we don't use Redux, we have to pass data to every child, even the child does not need those data, but when a grandchild needs. It is a massive effort when building complex applications. After a grandchild updates a data, in the same way we have to pass the changes to root component through several components. (see the illustration below for a clear picture in mind)

Since Child components get all data from the parent, it is harder to pass the data to deeper levels more than one child. When a grandchild component updates a value, it needs to be passed through more than one parent.


Image result for redux
Above image shows how complex it is to update a change when number of components gets increased in application. ( image credits: https://hackernoon.com/restate-the-story-of-redux-tree-27d8c5d1040a?gi=8d87a1156a58 ).

Redux gives you the facility of maintaining a single data store, with few key concepts.

Main concepts.
1. Store
2. Reducer
3. Action
4. Use of mapStateToProps()

At a glance in we'll look these concepts in a Simple manner

1. Store
Store is the global data store where all the application data resides. When a child component changes data, it is updated in the store, and other components may re-render based on the data changes.

2. Reducer
Reducer is a set of functions that does the create and update of store data.

3. Action
Action is a set of actions defined, which determines the reducer function to be called. When a component update store data, it calls the action.

4. Use of mapStateToProps()
mapStateToProps is a special function, which is called when rendering a component. When using redux, child components are sent data retrieved from store, as props to the child component. And also we can send data from parent as props even we use Redux. (Before using Redux we had to send all the data as props to the child)

Let's move to next post with a simple application