Showing posts with label react. Show all posts

Saturday, October 24, 2020

How to use React Event Emitter 3

Install event emitter using this command

npm install --save eventemitter3  

This is npm page for the package we are going to use.

https://www.npmjs.com/package/eventemitter3 

Let's be patient while this npm package installed. And we are ready to proceed.

It is better if we create this event emitter related code in a one file. It is plain javascript file, emitter.js in my case.

import EventEmitter from 'eventemitter3';
const eventEmitter = new EventEmitter();
const Emitter = {
  on: (event, fn) => eventEmitter.on(event, fn),
  once: (event, fn) => eventEmitter.once(event, fn),
  off: (event, fn) => eventEmitter.off(event, fn),
  emit: (event, payload) => eventEmitter.emit(event, payload),
};
Object.freeze(Emitter);
export default Emitter;


So now we can import this event emitter (emitter.js) to any component like below

import Emitter from '<path-to-event-emitter>/emitter';


Now let's assume we need to fire an event based on some condition. We can emit event like in below code.

Emitter.emit(SOME_CONSTANT_EVENT_NAME_ONE, {data_object_for_the_called_function} );


And also we need to an event listener for this SOME_CONSTANT_EVENT_NAME_ONE. We can define that event listener in another file or same file, as defined below.

useEffect( () => {
    Emitter.on(SOME_CONSTANT_EVENT_NAME_ONE, someFunction);
    return () => {
      Emitter.off(SOME_CONSTANT_EVENT_NAME_ONE, someFunction);
    };
} )

someFunction = (data) => {
    // do something with data
}


That's the very simple example of using React event emitter3. We can emit and catch multiple events using different event names (like SOME_CONSTANT_EVENT_NAME_ONE).

The main advantage taken from the event emitter was communicating changes happened in a component to another component, in projects where Redux is not used. And those communicating components were far way in the component hierarchy.
Saturday, July 6, 2019

React Redux


Why Redux?

Redux is used to maintain a global data store for the whole react application, which determines a very important concept, "Single source of Truth".

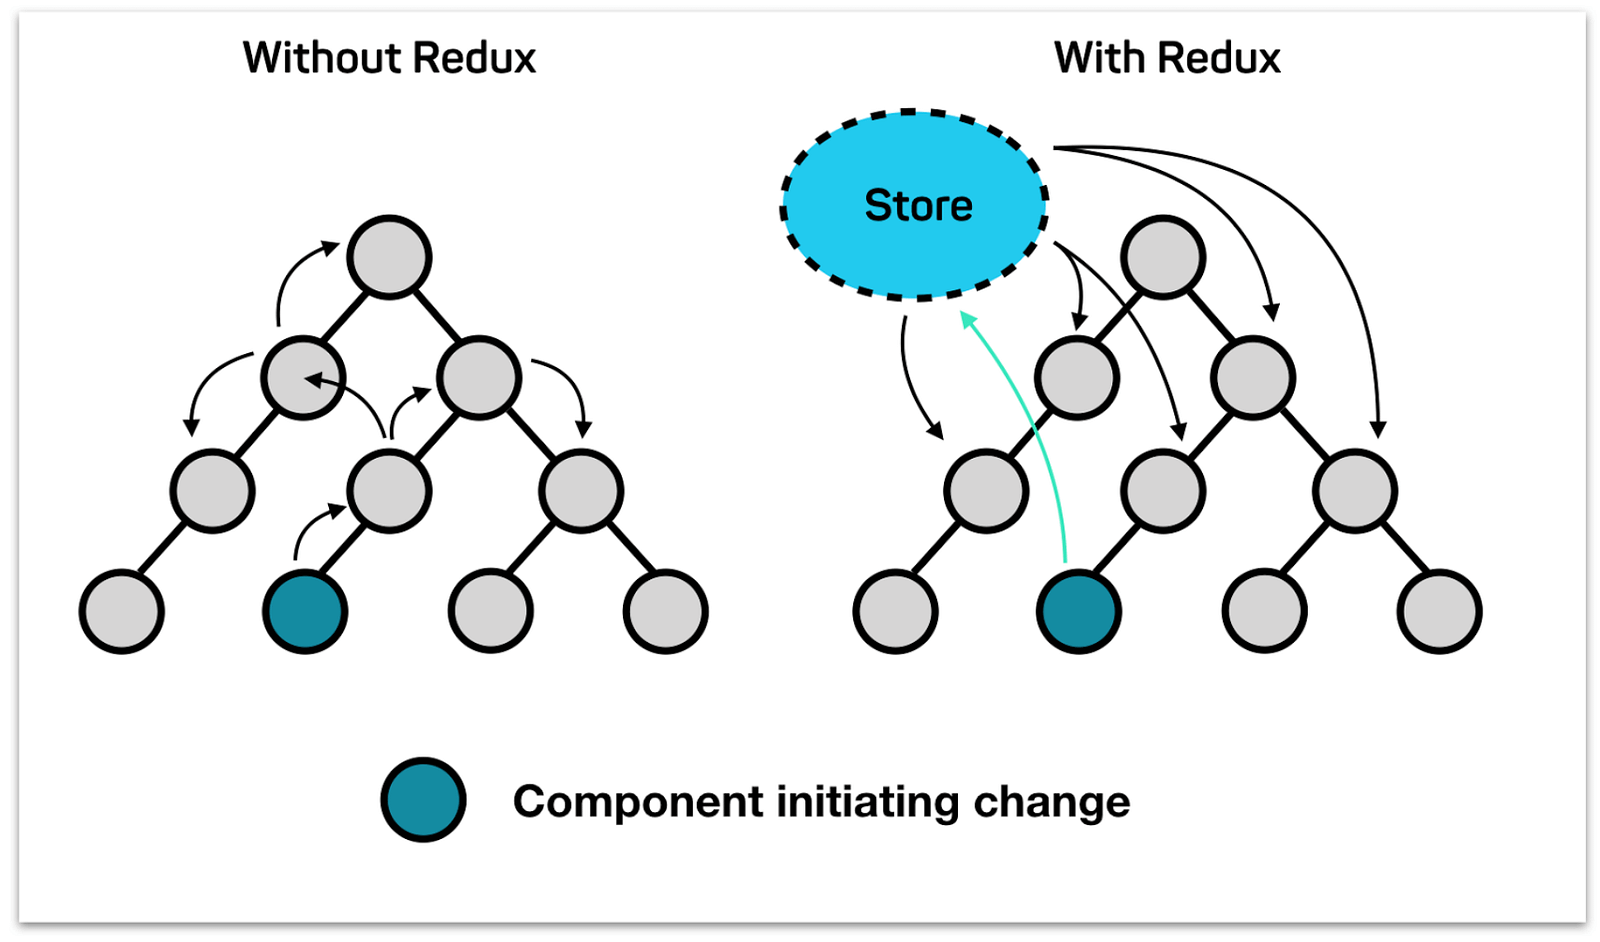
If we don't use Redux, we have to pass data to every child, even the child does not need those data, but when a grandchild needs. It is a massive effort when building complex applications. After a grandchild updates a data, in the same way we have to pass the changes to root component through several components. (see the illustration below for a clear picture in mind)

Since Child components get all data from the parent, it is harder to pass the data to deeper levels more than one child. When a grandchild component updates a value, it needs to be passed through more than one parent.


Image result for redux
Above image shows how complex it is to update a change when number of components gets increased in application. ( image credits: https://hackernoon.com/restate-the-story-of-redux-tree-27d8c5d1040a?gi=8d87a1156a58 ).

Redux gives you the facility of maintaining a single data store, with few key concepts.

Main concepts.
1. Store
2. Reducer
3. Action
4. Use of mapStateToProps()

At a glance in we'll look these concepts in a Simple manner

1. Store
Store is the global data store where all the application data resides. When a child component changes data, it is updated in the store, and other components may re-render based on the data changes.

2. Reducer
Reducer is a set of functions that does the create and update of store data.

3. Action
Action is a set of actions defined, which determines the reducer function to be called. When a component update store data, it calls the action.

4. Use of mapStateToProps()
mapStateToProps is a special function, which is called when rendering a component. When using redux, child components are sent data retrieved from store, as props to the child component. And also we can send data from parent as props even we use Redux. (Before using Redux we had to send all the data as props to the child)

Let's move to next post with a simple application